subota, 6. prosinca 2014.

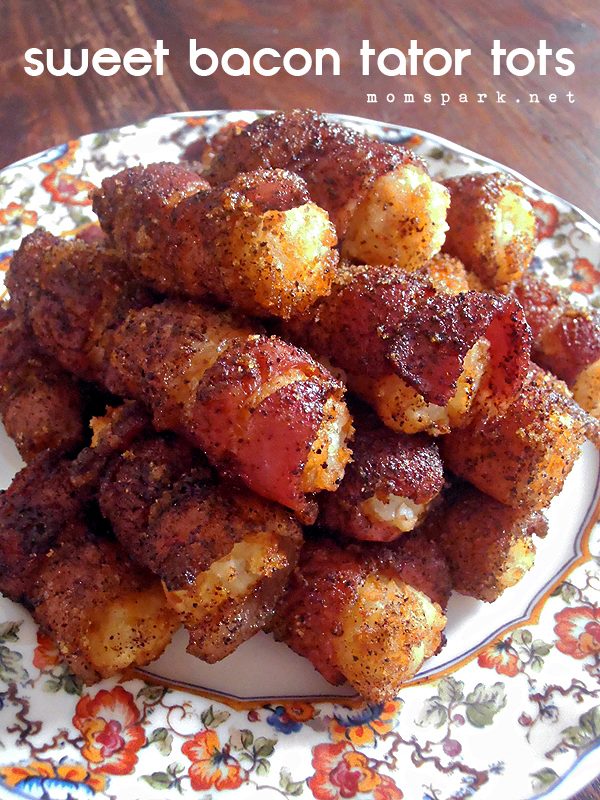
Sweet Bacon Tator Tots Recipe

Sweet Bacon Tator Tots Recipe


Sweet Bacon Tator Tots Recipe 
  
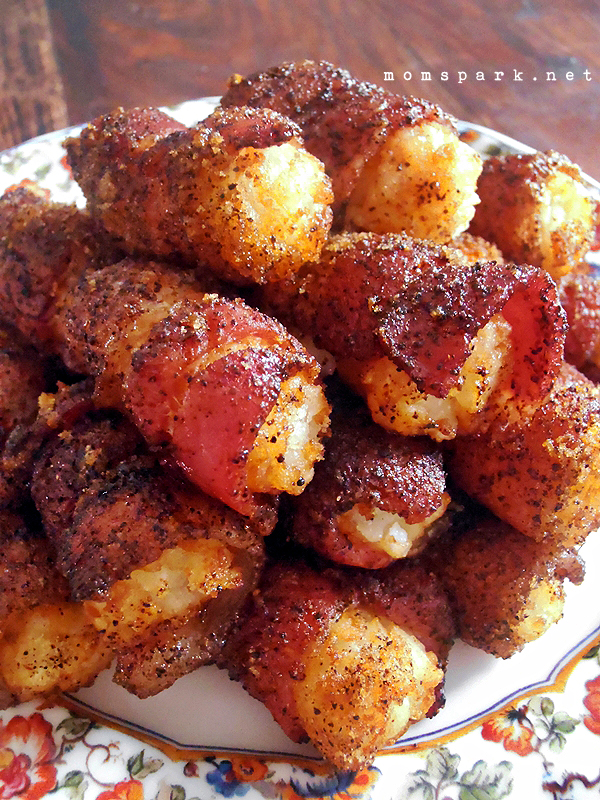
Sweet smokey bacon wrapped around tender tator tots. What more could you ask for in a savory appetizer? This recipe came from a wonderful food blog, The Cutting Edge of Ordinary.

Sweet Bacon Tator Tots Recipe 
 
If you have leftovers, reheat them in the oven to get them nice and crispy again. I had a small percentage of the tots break, so be gentle when transferring them to your serving dish. Enjoy!

Ingredients:

50 - 55 tater tots (thawed to room temperature)
1-16-ounce package Bacon (strips cut in 4 pieces)
2/3 cup Brown Sugar
2 tablespoons Chili Powder

Directions:

Preheat oven to 375 degrees. Line a cookie sheet with foil and place a cooling rack on top of the pan. This will allow the bacon to crisp on all sides.
Cut each bacon strip into 4 pieces. Cut the bacon in half and then cut each half in half again.
Wrap each thawed tater tot in bacon and then roll it in the brown sugar mixture. Place on top of the cookie rack.
Bake about 10 to 15 minutes at 375, then increase the oven to 400 and let them cook another 5 minutes. Check to see if they are crisping up. You may need to leave them in 5 minutes longer. Check frequently at this point so they don't burn. Serve warm.

Candied Cinnamon-Sugar Pecans

Candied pecans and nuts are usually thought of as a holiday treat.  I confess, I make them year-round and use them as a garnish for desserts, pies, cakes, cookies or ice cream.  Sometimes, I whip-up a batch for just plain munching.  My mantra is simple, life is short why wait until a special occasion to enjoy the flavors you love, right?


I really like using a combination of cinnamon and pumpkin pie spice to spice-up these nuts.  If you prefer you can use cinnamon alone without any other adjustments.   These candied pecans make terrific gifts poured into a glass jar and tied with a pretty ribbon.  Don't forget to attach a note with a warning, they are absolutely 100% addictive!


Ingredients you'll need:
4 cup pecan halves
1 large egg white
1 Tbsp pure vanilla extract
1/2 cup granulated sugar
1/2 cup packed light brown sugar
1 1/2 tsp ground cinnamon plus 1 tsp pumpkin pie spice or 2 tsp ground cinnamon
1/4 tsp salt

Directions:
Preheat the oven to 250°F.  Butter the bottom and sides of a 15x10x1.5-inch jelly roll pan.  In a mixing bowl, beat together the egg white and vanilla extract until frothy and light beige in color.


Coat the pecan pieces in the beaten egg white stirring until evenly coated.


Place the granulated sugar, brown sugar, spices and salt in a large plastic storage bag. Seal the bag and shake to combine.  Drop the pecans into the sugar mixture.  Seal the bag and shake until the pecans are coated on all sides.


Spread the nuts in a single layer on the jelly roll pan.


Bake for 1 hour stirring every 15 minutes. Spread on wax paper and cool completely.  Store tightly covered at room temperature.  Yield: 4 cups

Banana Pudding Cupcakes

We love cupcakes!  What's not to love, right?  The versatility of flavor combinations and fillings is only limited by your imagination.  They don't require forks or spoons and... they're portable! 

This cupcake combines two desserts to make one delectable handheld treat.  If you prefer to bake completely from scratch, a basic butter cake batter works beautifully.  Portable banana pudding, it doesn't get much better than that.
 
Ingredients you'll need:
1 box vanilla cake mix, plus ingredients to prepare
Or from scratch using 1 batch Old Fashioned Butter Cake batter
For the filling:
1 [8 oz] container spreadable light cream cheese, softened
1 [14 oz] can sweetened condensed milk
3/4 cup whole milk
1 box [3.4 oz] instant vanilla pudding
1 [16 oz] frozen whipped topping, thawed & divided
3 bananas
1 tsp pure vanilla extract
1 cup crushed vanilla wafer crumbs for garnishing

To prepare the cupcakes:
Preheat the oven to 350°F and line two 12 cup muffin tins with liners.  [Depending on how you separate the batter,  you'll have 18-24 cupcakes total]  Prepare the cake mix per the instructions on the box using buttermilk in place of the water.  Use the same quantity of eggs recommended by the package directions.   Bake the cupcakes per the directions then set aside to cool.  From scratch, one batch of my Old Fashioned Butter Cake batter.

To prepare the filling: 
In a mixing bowl, whip together the softened cream cheese and the sweetened condensed milk for around 2-3 minutes until light and fluffy.  Next add 3/4 cup whole milk, 1 tsp vanilla and package of instant vanilla pudding mix.  Whip the ingredients together on medium-high speed for 3-4 minutes until the mixture thickens.  Fold in 1 cup of thawed whipped topping by hand.  Slice and quarter the bananas just before adding to the custard, so, they won't brown.  Fold the chunks of chopped banana into the custard. 

To assemble:
Using a sharp knife, cut the middle out of each cupcake leaving a 1/2 inch border around the edge.  Be careful not to cut all the way to the bottom of the cupcake shell.  The centers of the cupcakes are treats for the baker or for keeping the kids happy while you work!  Sprinkle half of the crushed vanilla wafer crumbs into the bottom of the cupcake shells reserving the other half for garnishing the tops.  Divide the filling between the cupcakes.  To finish the cupcakes, pipe a dollop of  whipped topping on top and sprinkle the tops with the remaining crushed vanilla wafer crumbs.  Chill thoroughly before serving. Yield: 18-24 filled cupcakes

Cook's note:
Due to the fact that bananas begin to brown quickly, I recommend making these cupcakes and serving them on the same day.

Garlic-Parmesan Cheese Pull Apart Bread [Using Rhodes Frozen Yeast Rolls]

This pull apart cheese bread is  the savory cousin to our all time sweet, pull apart favorite...monkey bread.   Frozen dinner rolls, butter, cheese and garlic, well, that just about sums it all up! I baked it in a standard size loaf pan to resemble a loaf of bread, but, you can make this bread into any shape you like.  [Read for other options at the very end of the recipe]  It's especially good with a warm marinara sauce for dipping, or a cheese fondue, or simply on it's own.
It's so much more interesting than dinner rolls and you'll love the looks on your friends faces when you pull this out out of the oven for dinner!  Serve it straight from the pan, and if you're feeling really sassy,  brush a little melted butter on top for the shine....oh my!

Ingredients you'll need:
16 frozen white dinner rolls [I used Rhodes]
1/2 cup [1 stick] butter, melted
2/3 plus 1/4 cup grated Parmesan-Romano cheese [divided]
1 tsp dry parsley flakes
1 tsp garlic powder
1/2 tsp salt
1/2 tsp dried basil or Italian seasoning
1/2 tsp onion powder

Directions:
Remove the frozen dinner rolls from the freezer and place onto a plate.  Cover loosely with plastic wrap and allow the rolls to sit on the counter for 30-45 minutes or so, until the rolls have thawed enough to cut.


Place the rolls onto a cutting board, and using a sharp knife, cut each roll into quarters.


Melt one stick of butter in the microwave, yes, that's right kids, one whole stick!  Don't worry, we're sharing this bread.... stir the melted butter and seasonings together until blended.


Add the quartered rolls to the butter, and toss gently to coat.  Bread dough is sticky, so, you may need to use your hands to gently pull the pieces apart if necessary.  You don't want the dough to form clumps, or it will effect how it bakes.  This is really the only way to mess-up this recipe....very important!  Next, add 2/3 cup of grated Parmesan-Romano cheese reserving the rest for the top.  Toss until each piece is coated.


You can bake this bread in any shape you like, but, today, I chose a loaf pan.  Layer the dough quarters evenly in a standard 9x3x2 inch loaf pan sprayed with cooking spray.  The dough pieces naturally stick together due to the butter and cheese, but, gently pull apart any clumps of dough.  We want to be certain the bread bakes evenly.  Sprinkle the remaining 1/4 cup of cheese on top and a sprinkle of parsley for color.  Cover the pan loosely with plastic wrap that has been sprayed with cooking spray.  This will keep the bread from sticking to the plastic wrap as it rises.


Allow to rise in a draft free, warm place for 2-2 1/2 hours. Then, remove the plastic wrap, and place into a 350°F preheated oven.


Bake at 350°F for 18 minutes, then check the top.  If baking in a loaf, you may need to lay a piece of aluminum foil over the top of the bread to prevent the cheese and butter on top from over browning while the inside of the loaf fully bakes.  Continue to bake the bread for another 5-7 minutes,  until the center is completely done. Approximately, 23-25 minutes total, depending on your oven.  Test the center of the rolls using a cake tester, or toothpick to be certain the bread is cooked all the way through before removing it from the oven.  My favorite way to serve this bread?  Straight from the pan piping hot! Yield: one loaf  or 16 servings [4 pieces]

Cook's note:
If you're someone who loves for all of the rolls to have that crispy golden top,  bake the bread in a round 9 inch spring form or pie pan.  Follow the same preparation method and bake for around 22-24 minutes until golden and cooked through. 
  
Additional baking options:
Bundt pan
Divide the dough between 2 loaf pans
Individual size in standard muffin cups [4 pieces in each]
8x8 baking dish
9 inch round spring form or pie pan
8 inch tart pan

*Update: 7/4/12*

I made this bread today in a round spring form pan, and my family enjoyed it so very much!  I think this is quite possibly my favorite way to make this bread!  In a spring form pan, arrange each piece side by side, and all of the rolls will get that crispy golden topping!!!  Simply delicious and perfect for sharing!  Also, I increased the Parmesan a bit with this batch, since there's no way you can ever go wrong adding a little extra Parmesan cheese! :)  

Here's  what it looked like.....


And, yes a little is missing...funny thing about this bread, it begins to disappear as soon as I take it from the oven!  Enjoy everyone!


* This is a picture of the rolls that I used, reference the Rhodes website for further product information.
petak, 5. prosinca 2014.

Oven Baked Tacos


Oven Baked Tacos


Details

Cooking Time:
35
Recipes Makes:
12
Calories:
234
Carbs:
12
Fat:
9
Protein:
26

Ingredients 

2 lb ground beef
1 can refried beans
1 can of tomato sauce
1 packet taco seasoning
1 oz shredded cheese
12 tortillas/taco shells

Directions

Start with the taco shells, buy them in the store or make em yourself. If you make them yourself, I don’t think you will ever go back to purchasing taco shells. All you need is some tortillas and cooking spray. We used some small, soft “taco” tortillas. We used the flour kind but corn is fine too.

First you want to steam them… Wet some paper towels and wring them out well. Layer the tortillas with the wet paper towels on a plate and then microwave (we did 6 at a time). Keep an eye on them, it should be about 30 seconds until they are steamed. Then lightly spray each side with cooking spray and drape each tortilla over two bars of the oven rack. It is wise to put a baking sheet below them to catch any oil from the cooking spray. Bake at 350-375 degrees for 7-10 minutes. You will be able to tell that they are browning & getting crispy. Take them out and set them aside!

Okay, now for the filling All you need is ground been (2 pounds), 1 can of refried beans, 1 can of tomato sauce, 1 packet of taco seasoning, shredded cheese, & your favorite taco toppings.

Brown the ground beef in a large skillet. COMPLETELY drain all grease and return to skillet. Over low heat, add refried beans, taco seasoning, and about half to two-thirds of the tomato sauce (you can eye this to see whats best, you don’t want the filling to be too runny or your tacos will be soggy on the bottoms). Blend well and scoop into the tacos (which should be “standing” in a lightly greased casserole type dish). Then just sprinkle the cheese over the top and bake. I think I did my at 375 degrees for about 10 minutes.

watermelon lemonade

watermelon lemonade

The flavors of summer are celebrated in this very refreshing, not too sweet watermelon lemonade.  Perfect by itself on a hot day, or served with a splash of vodka for a delicious cocktail – this drink is summer in a glass.

Ingredients

how to

  • Make a simple syrup by bringing the sugar and 1/2 cup water to boil in a small pan.  Allow to simmer for a few minutes, then remove from heat.
  • Stir in the cold water, then pour into a pitcher and add the lemon juice and watermelon puree and stir to combine.
    (to make the watermelon puree, just puree chopped pieces of melon in a food processor, then push through a fine mesh sieve to remove the seeds and pulp)
  • If using vodka, use a cocktail shaker to shake 1 part vodka with 4 parts lemonade and pour over ice, or fancy it up a bit and serve straight up in a chilled martini glass.

Lose weight with Ginger & Garlic (Results already in one week)

Lose weight with Ginger & Garlic (Results already in one week)

A balanced diet and exercise plan is the cornerstone of an effective weight loss program, but certain herbs could help in your efforts. Although there’s no miracle pill, both garlic and ginger show promise in helping you lose weight and in maintaining optimal weight. It’s easy to incorporate ginger and garlic into your diet, since they can be used as seasonings in many recipes. Check with your doctor before taking any herbs for weight loss; they could interact with medications or other herbs.

Garlic and Fat Storage

In a study published in the “Journal of Nutrition” in 2011, rats were fed high-fat diets to induce obesity. After eight weeks, the scientists introduced some of the rats to a daily dose of garlic. After seven weeks, the garlic group had less fatty tissue compared to the control group, even though they were on the same diet. The scientists discovered that the garlic had reduced the expression of genes in the body involved in storing fat. The suppression of this genetic expression has not been looked at in humans, however.

Aged Garlic and Weight Loss

A Korean study published in “Nutritional Research and Practice” in 2012 looked at heart disease risk in postmenopausal women, who are naturally at a higher risk due to changes in metabolism. For three months, one group of women were administered 80 milligrams of aged garlic extract daily. At the end of the study, the researchers found the group had lost weight significantly compared to the placebo, measured in body fat percentage and body mass index. They concluded that regular supplementation with aged garlic can reduce body weight and fat and even lower your risk of heart disease.

Ginger and Appetite Reduction

According to a study published in “Metabolism” in 2012, ginger has a thermogenic effect, which means it heats up the body. This effect has been found to suppress appetite in middle-aged overweight men. In the study, the men who supplemented with ginger reported less hunger and lower prospective intake of food. The researchers concluded ginger could possibly play a role in weight management by causing you to take in fewer calories. When you consume fewer calories than you burn, you lose weight.

In Diabetes Treatment

A study published in “Complementary Therapies in Medicine” in February of 2014 gave one gram of powdered ginger to type 2 diabetes patients three times daily. After eight weeks, they found their blood sugar levels and insulin sensitivity had reduced. The scientists concluded ginger is useful for type 2 diabetes patients. According to a study published in the “Journal of Nutrition” in 2006, aged garlic was found to reduce oxidation and glucose in test tubes. However, research on the effects of garlic on glucose in humans is lacking.